
Marbling: A beginners experience
The contents of this post were originally published in my old blog in 2017,. It has been rebuilt and reposted here with minimal changes.
Ebru, also known as marbling, is a traditional Turkish art that has evolved and developed over many centuries into a multidimensional art. It is still practiced in keeping with its tradition, but also in contemporary ways and settings, both in the East, West, and everywhere between.
It is performed by placing paint on the surface of a liquid called a size. The size is dense so that watered down paints and pigments can be applied to it without sinking. These paints and pigments sit on the surface of a size and, depending on how much water they contain, spread over the surface in different ways. They can then be manipulated with tools like combs or needles. Depending on how they are manipulated they may “mix” or they may remain clearly differentiated. When done, paper or fabric that has been treated with a mordant (a coating that makes the pigment stick to the material) is carefully placed onto the surface of the size so that the paint can transfer. The paper is then rinsed, and hung or laid to dry.
There are many different strategies in application and manipulation of paint and of paper which lead to different results. In fact, you can never exactly repeat or reproduce a result—though you may try or manage to create something similar—because it is such a sensitive process. The products can be large or small, abstract or realistic, complex or simple. It can be applied to a plethora of materials and many different pigments or paints can be used; Ebru artists are constantly innovating in their practices.
[In fall of 2015], I wanted to expand the reaches of my skill set by experimenting with an entirely new (to me) process. I decided to try marbling because it is performed entirely differently from my usual practice of illustration—it’s done on the surface of a liquid. My most comfortable style of drawing uses a lot of hatching and line work. I wanted to challenge myself to draw more fluidly and explore a different creative mindset. After some initial research and practice, I quickly became inspired by the history, the process, and the results of Ebru. In marbling, all of the aspects of the composition - color, form, movement, order, etc. - are integrally related. Depending on how you build a composition you can achieve very different results.
A major concept I kept in mind throughout this process was: "hiding" elements within compositions. What are the different ways to camouflage elements? How can they be intrinsic in their environment and still need to be found?
General Tools:
Combs of varying patterns (handmade with nails, balsa wood, duct tape), carving picks, and skewers.
16x22 inch aluminum baking pans
100% cotton paper- Strathmore, Arches, Stonehenge- varying weights (90lb/250gsm, 140lb/300gsm), 22x30 inches cut into 2-4 pieces.
— Click on any photos or videos to enlarge them —
Round 1: Muddy & Indistinct
As I began researching the marbling process. I looked at a number of project tutorials, but decided to reference only one for the sake of clarity.
This first tutorial called for the use of methylcellulose as the size, watered-down acrylics as the pigment, and heavy weight, cotton-rag paper as the substrate. The methylcellulose was kept refrigerated after mixing and setting (about a 5 hour process) in order to prevent it from molding.
Batch 1: Trying To Make Herbal & Bird Motifs

See some of my first attempts drying around the floor.


The results I did get were less than vague for a number of technical reasons, in addition to strategic.
Even though I watched a number of videos of artists marbling a range of designs, I still didn't seem to have a sense of how the colors were going to spread or interact, how the size would move, or how the order in which I did things in would affect the results. When I first tried to create a figural image, the paint would expand too much and the image seemed impossible to shape. Gradually I began to get a feel for placing the paint and had some luck with forms, but not a lot.
Some of the most notable problems were that:
The acrylic paint was bonding to the size more than the paper, so that if I rinsed off the extra methylcellulose nearly all of the color would come off with it.
If I left the excess size to dry in order to keep the color, it would result in large, gunky, puddles, which were mucky colored, caused the paper to warp, and completely obscured any design underneath.
The colors did not spread evenly over the methylcellulose and would form dense patterns in some areas and pale ones in others.
The paper, being very stiff, would push the fluid underneath it, creating distortions in the design or trapping air, which left bare spots.
Batch 2: Polar Bears, Blues, and Other Attempts
The first batch of designs I had done this round were (in my opinion) an absolute wreck. Tigers, birds, and even simple herbal motifs were unintelligible. In this small second set, I managed to get some forms (polar bears), but they were very washed out, and the size was too cold and thick to work with. Even though I was working with the same materials and facing the same limitations, I had learned just enough to kind of make something happen; I managed to develop my first, semi-intelligible, forms with two bears (on separate papers).


Interlude: An Attempt to Salvage With Paint
In order to make the most of my flops, I decided to try mimicking the effect of ebru with gouache paint while painting on the marbled paper. While it couldn’t remotely recreate the effect of ebru, it did help me play with my compositions and get a sense for seeing and pulling shapes out of formless painting.
I actually really like the effect of it, though I didn't use these experiments in any finished product or project. I think the contrast of the ethereal and unclear paper with the soft, but brightly defined, gouache has a really alluring effect, as though the figures are literally rising from the swirls. It’s a process I intend to revisit, play, and further explore with in the future.


The large center area is where the size pooled and washed away paint. I took advantage of that as a base tone to paint the bears.

Rounds 3 & 4: Refined Techniques
There were a couple of very important changes between this round and the last:
Upon further research, I discovered that carageenan is used as a more traditional, but still affordable, marbling size— the result was a finer size with smoother movements and less mixing of the paint and gel.
I began experimenting with lighter weight papers, ranging 150lb-220lb, sturdy enough to hold up to the saturation and transfer process, but thin enough to bend and lay over the tray gently.
I began treating the paper with the mordant Alum in order to bond the pigment and the paper better, resulting in better, sharper prints and less wash off.
I stopped keeping the size in the refrigerator, as being too cold caused the water to move along the surface in crystalline or really thick ways. Instead I made the size the morning of my marbling session and used it all that day.
Simply put, by now I had developed a better understanding of the way the paint and fluid respond to manipulation, and a sort of "order of operations".
Challenges:
Achieving even coating of mordant.
Applying the right amount of mordant (too much causes and "cracking" of pigment, too little doesn't work).
Laying down paper without distortions or bubbles.

Hanging my Alum soaked, 180lb papers to dry.
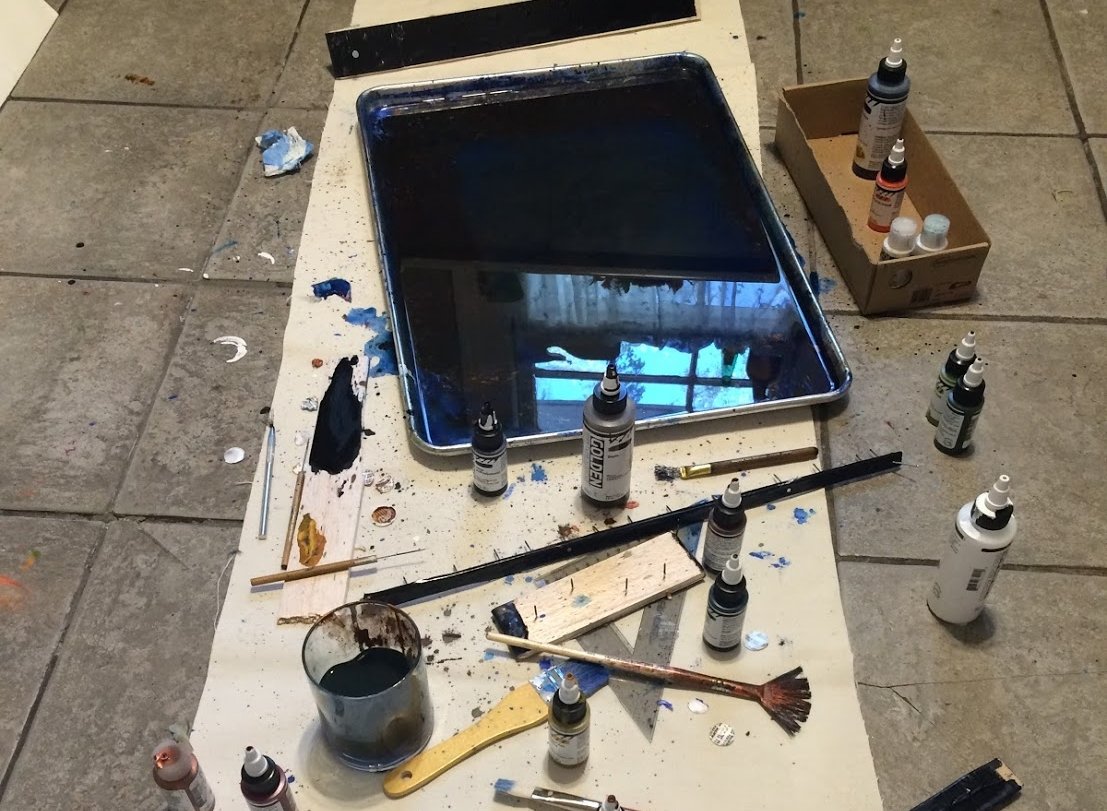
After a few compositions, pigment can settle below the size, which is why the tray appears dark blue. Eventually, the size does become dirty and can discolor your work. Various tools are shown here; combs, picks, and I used the fan brush to scatter paint along the surface.
Round 3: Successful Polar Bears & Blues
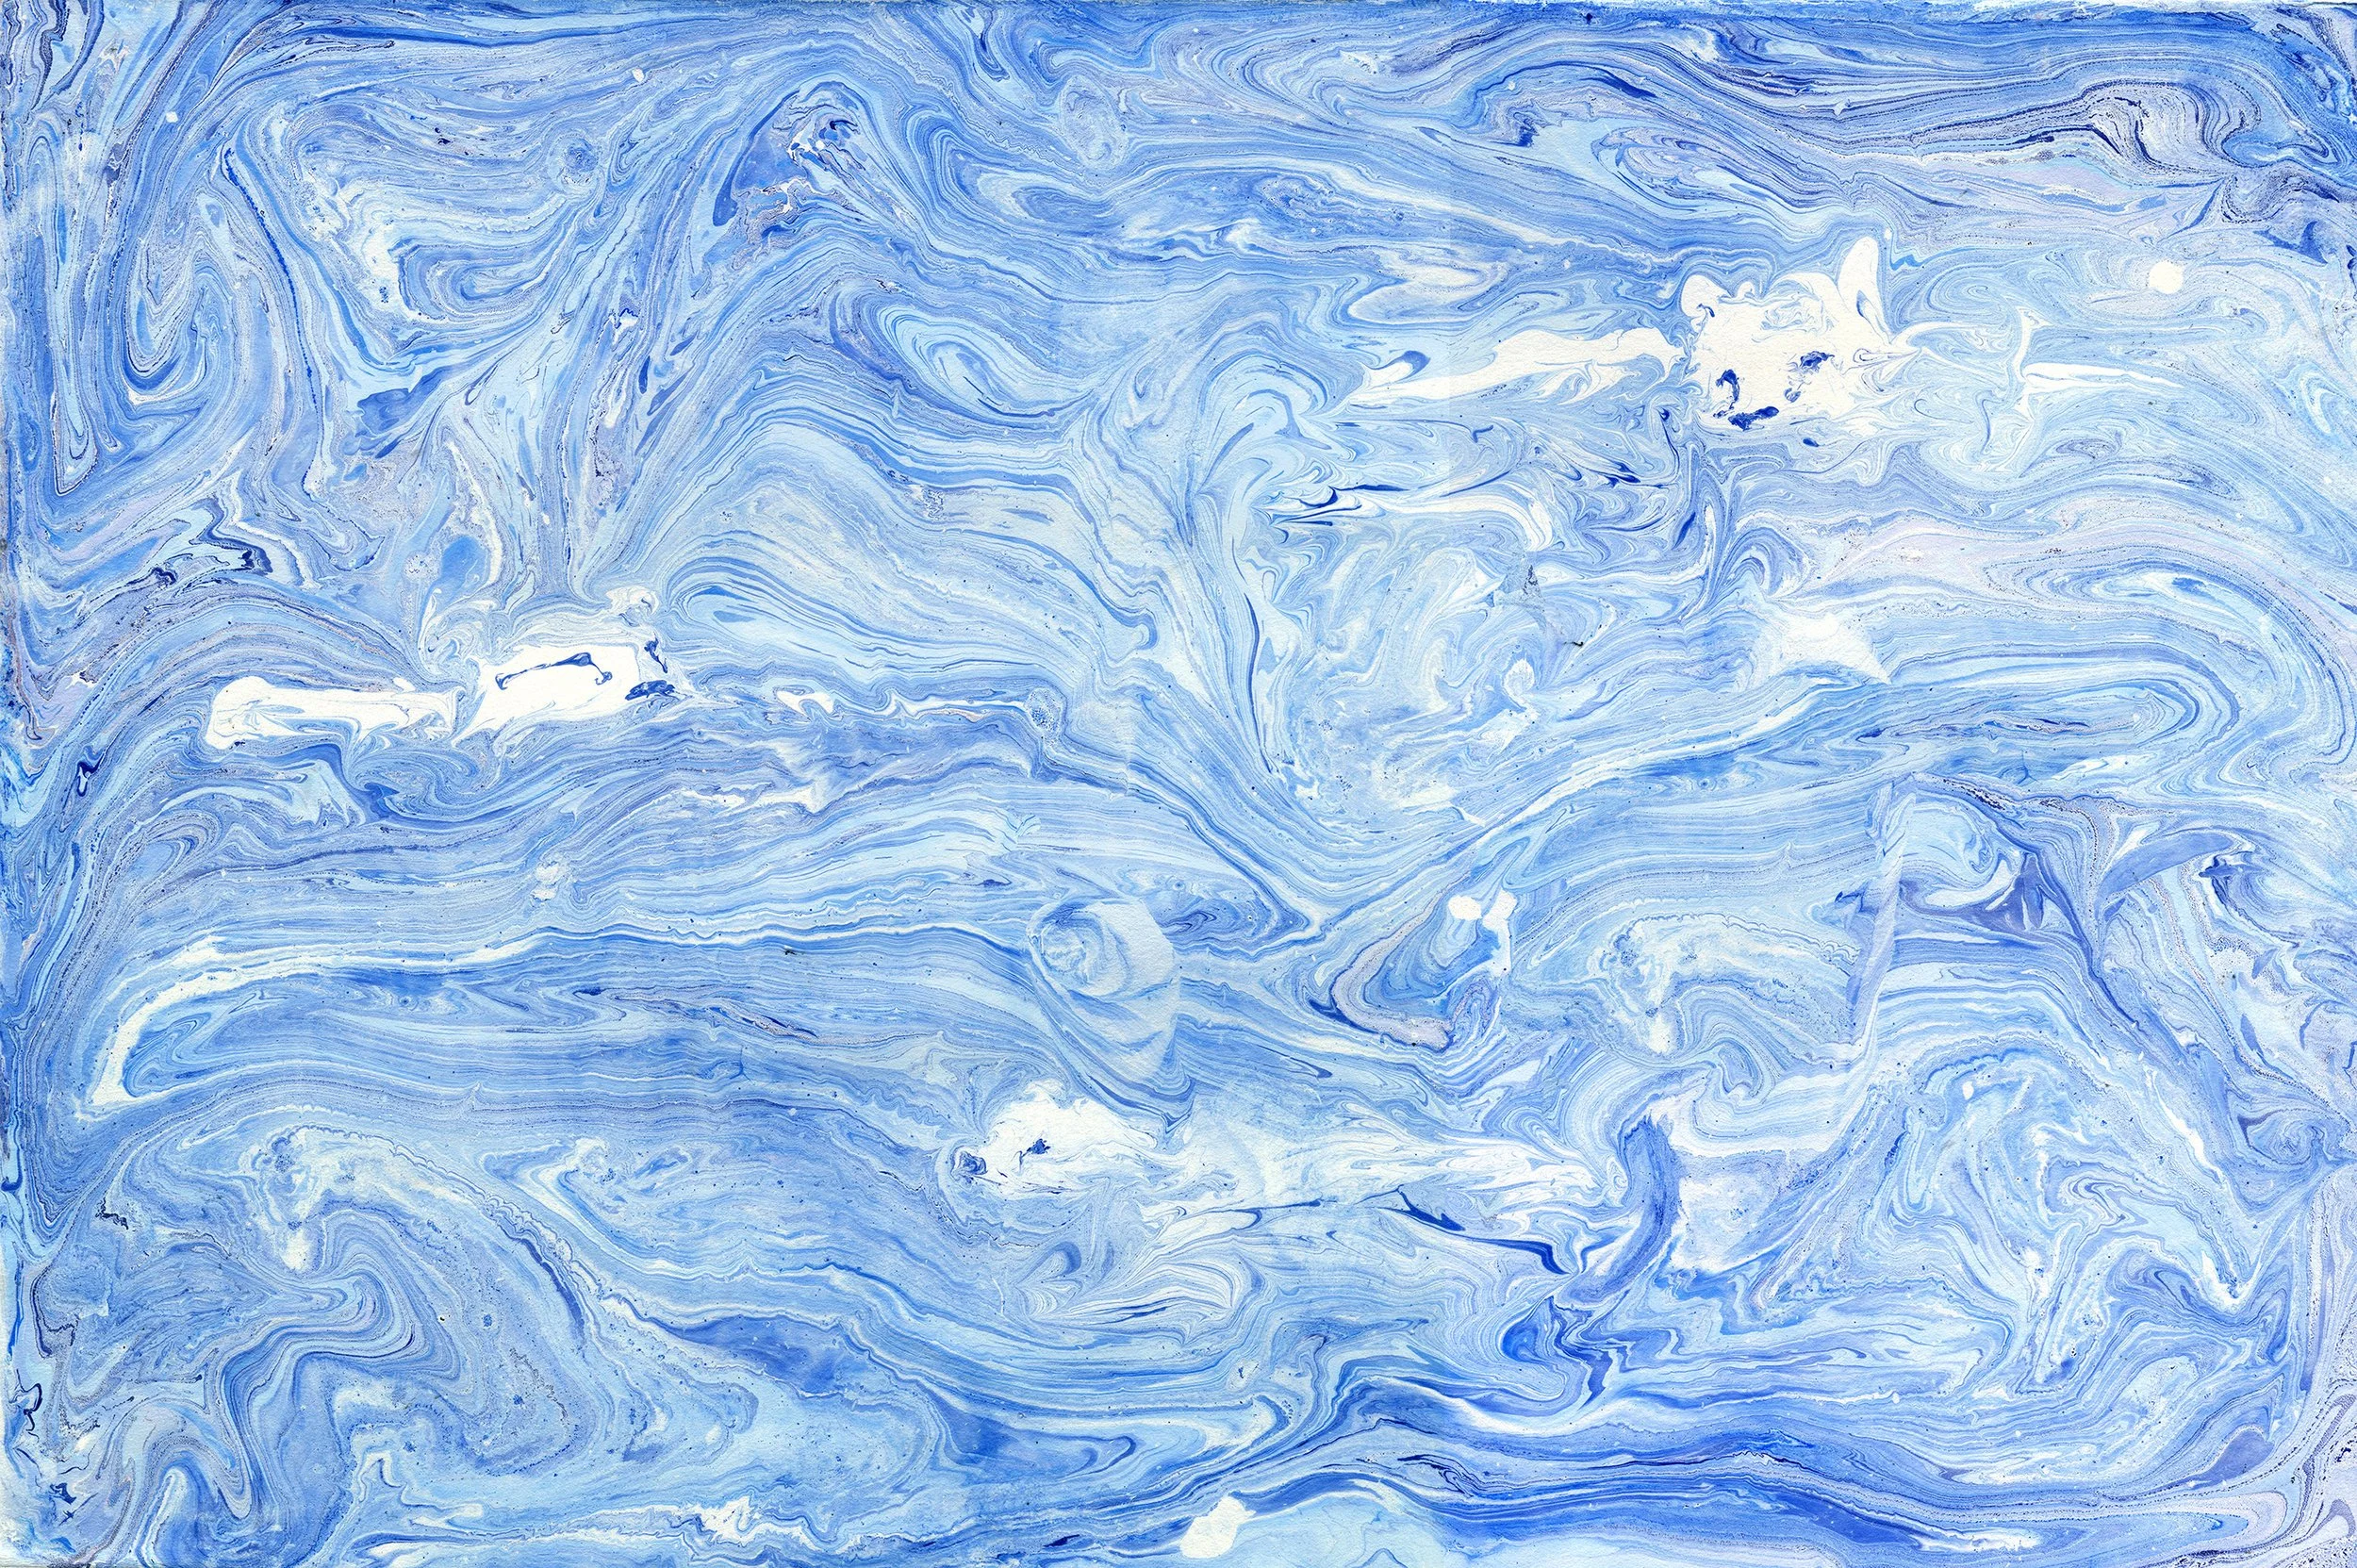
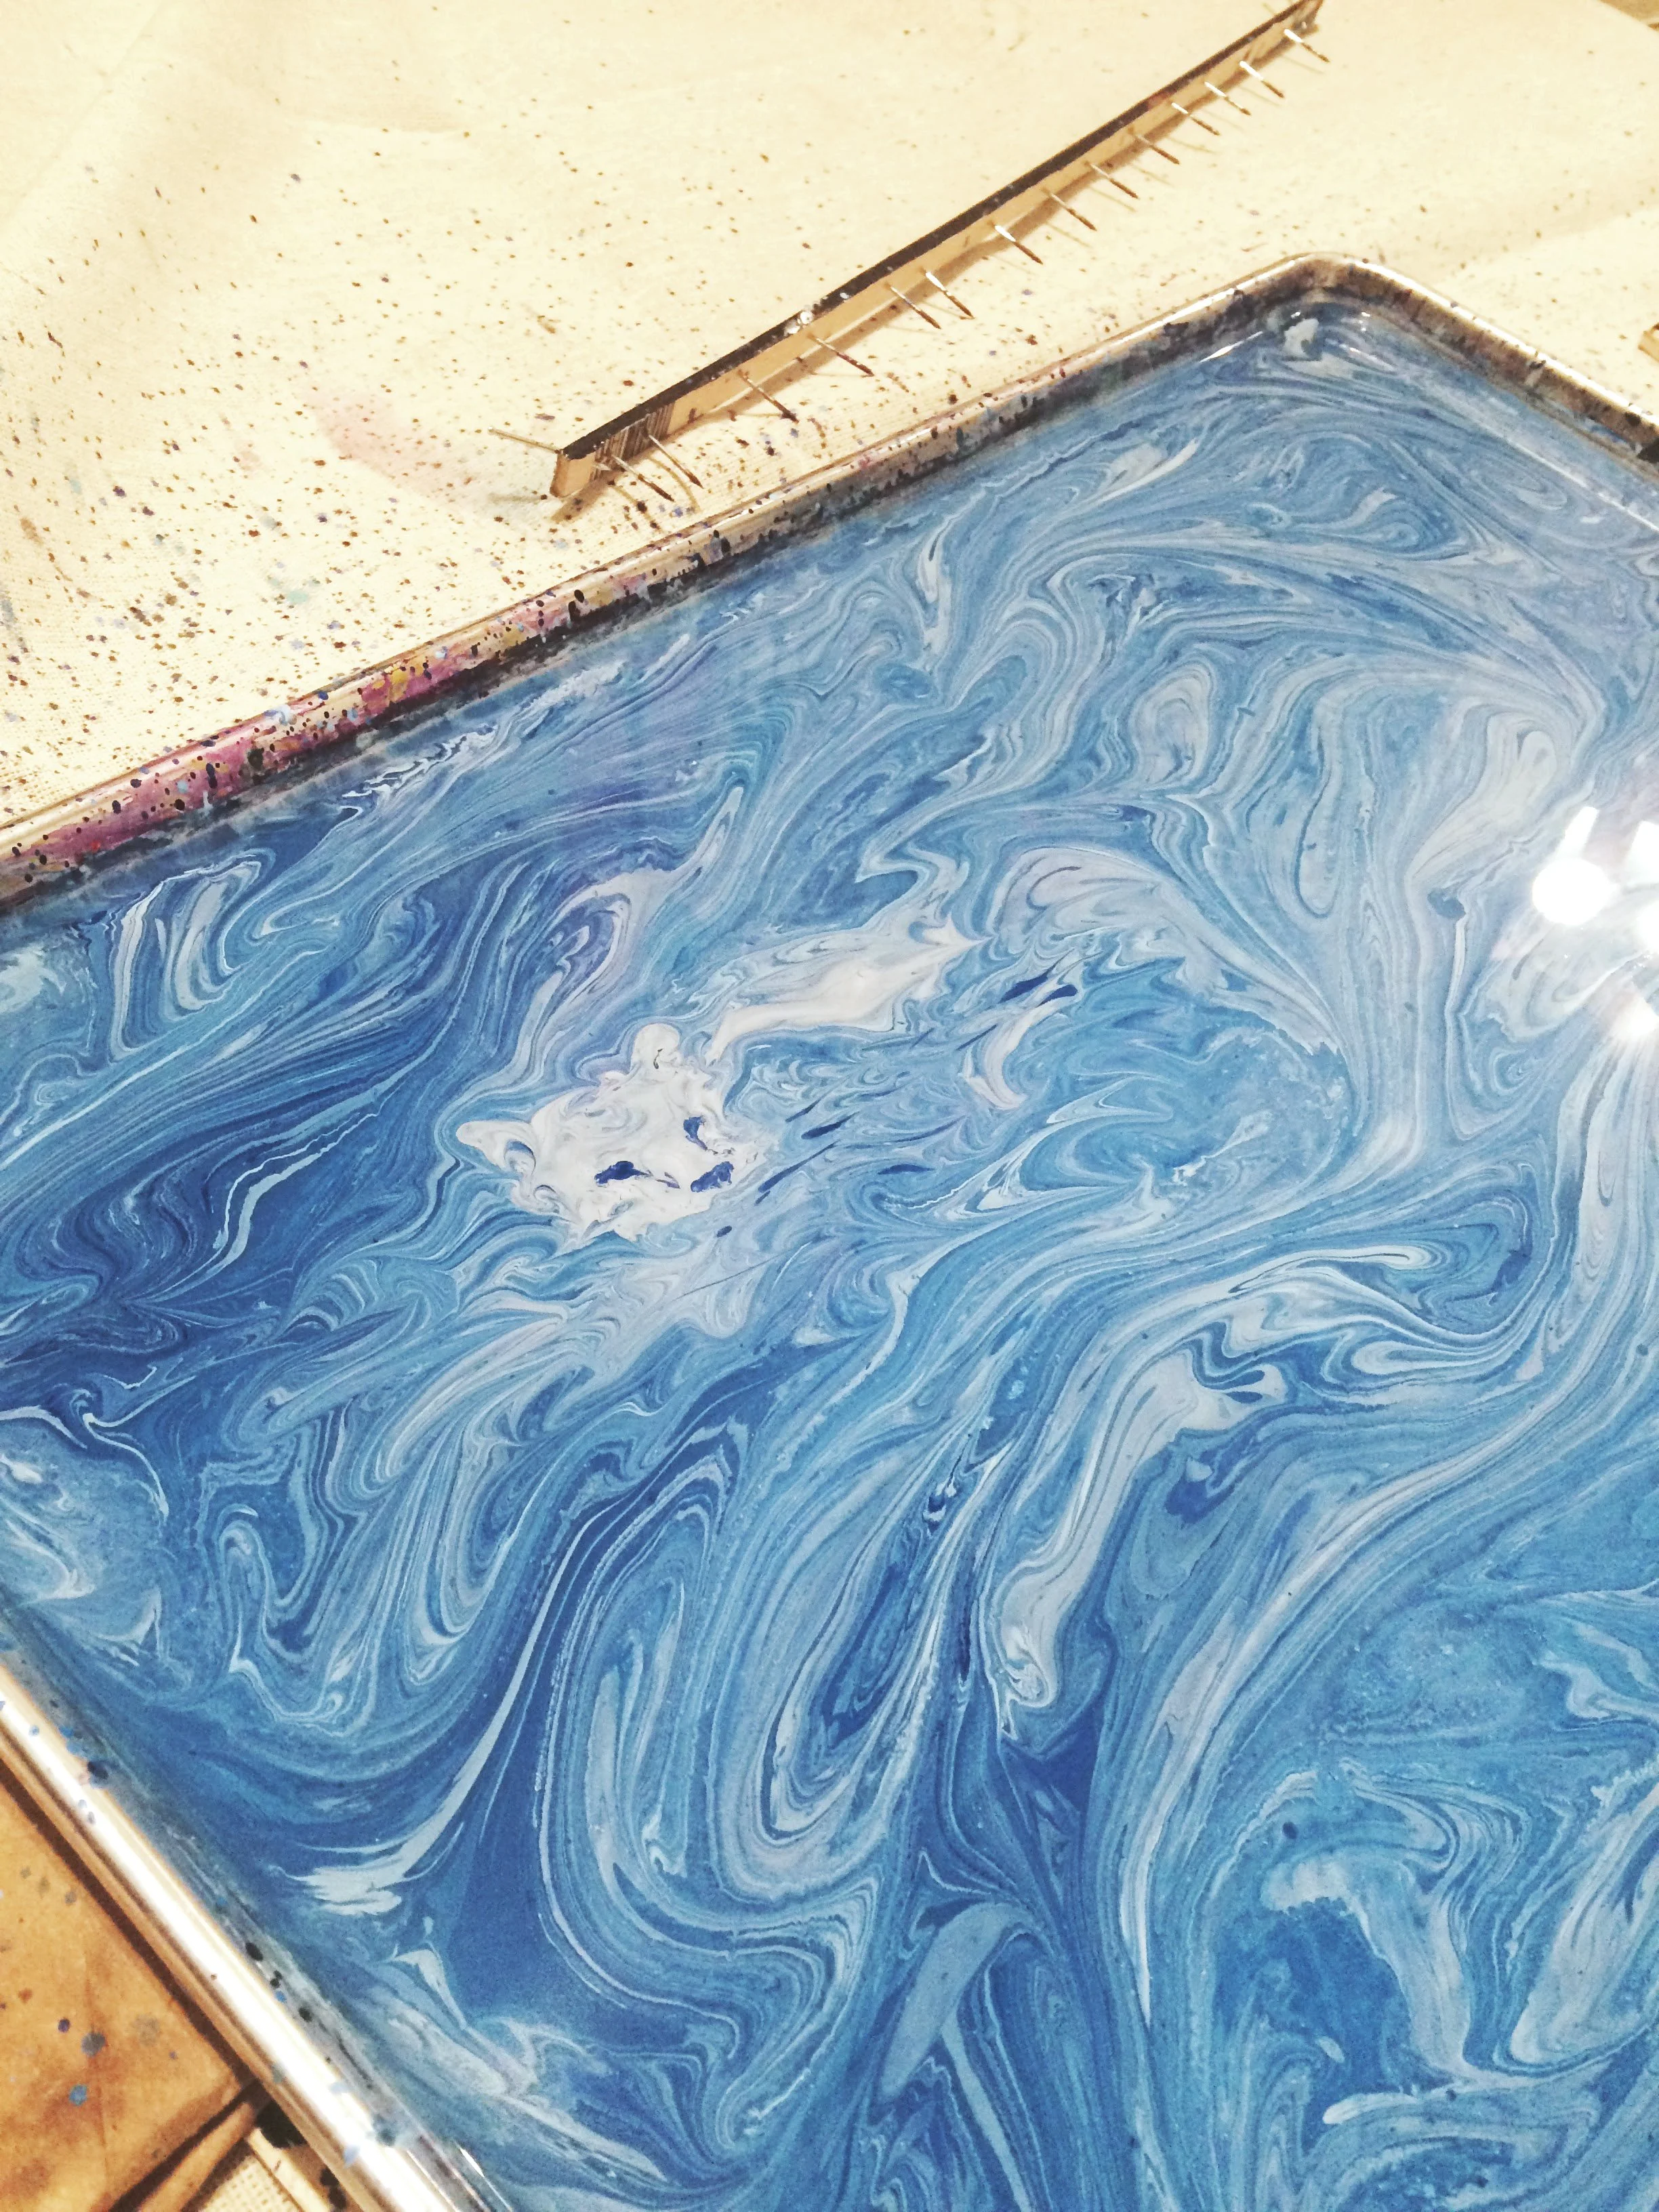
The paint sits on the carageenan
The three bears print was used in two different scarf designs, a long and a square one (see Ice Caps Collection).A picture of the first bear that was worked into the marbling composition (see how the image is reversed in the print transfer). The wide comb pictured (above right photo) was used to swirl the blue water base, while a single pick was used to place and form the bears. A very small amount of the process is embedded from my instagram below


